Hey ya'll it's day 30 of the nail art challenge! How great is that! Tomorrow is basically a bonus day in case the month you're doing the challenge has 31 days, so I'll probably just pick a few of my favorites from the month and feature them- which in effect makes today the last day of the challenge. Today's prompt is a tutorial and last week I posted this pic on facebook and enough people liked it that I wanted to show you a tutorial for it:

And thanks to my mom for being a fabulous model :) Basically this is a lacy half moon mani and I'll take you through step-by-step on how to achieve this look.
1)As always, start out with a nourishing base coat of some kind. Then use 1-2 coats of your base color depending on it's opacity. This is Sinful Colors Get It On which is matte without top coat.

2) Next draw a curved line where your little half moon would be on your natural nail. The thinner you make this line the more delicate your lace will appear

3) This picture has two steps because my cat decided to jump on the power cord right when I was editing the one in between and I lost it lol, but as you can see, you add a small half circle within the rainbow line you just drew.
4)Then you draw some scallops along the top rainbow- I did one larger in the middle, then two smaller on each side, and then repeated that pattern. I did all this detailing with white acrylic paint. You'll find that if you want to do intricate nail art- using acrylic paints comes in handy because you can much more easily correct mistakes compared to using all polish.

5) Take the tip of your detailing brush that you've used thus far and make small dots on the tips of each scallop on your curved line. Sorry about the blurry pics for these last two- I had a hungry monkey pulling on me as I tried to photograph :) I know all you moms out there feel me on that one.

6) Lastly, make small lines between the half circle and your curved line. That will finish you up- and now you give your acrylic some dry time cuz there's nothing worse than working hard and carefully on some delicate lines just to have them smeared by top coat.

Here is your finished look with top coat:
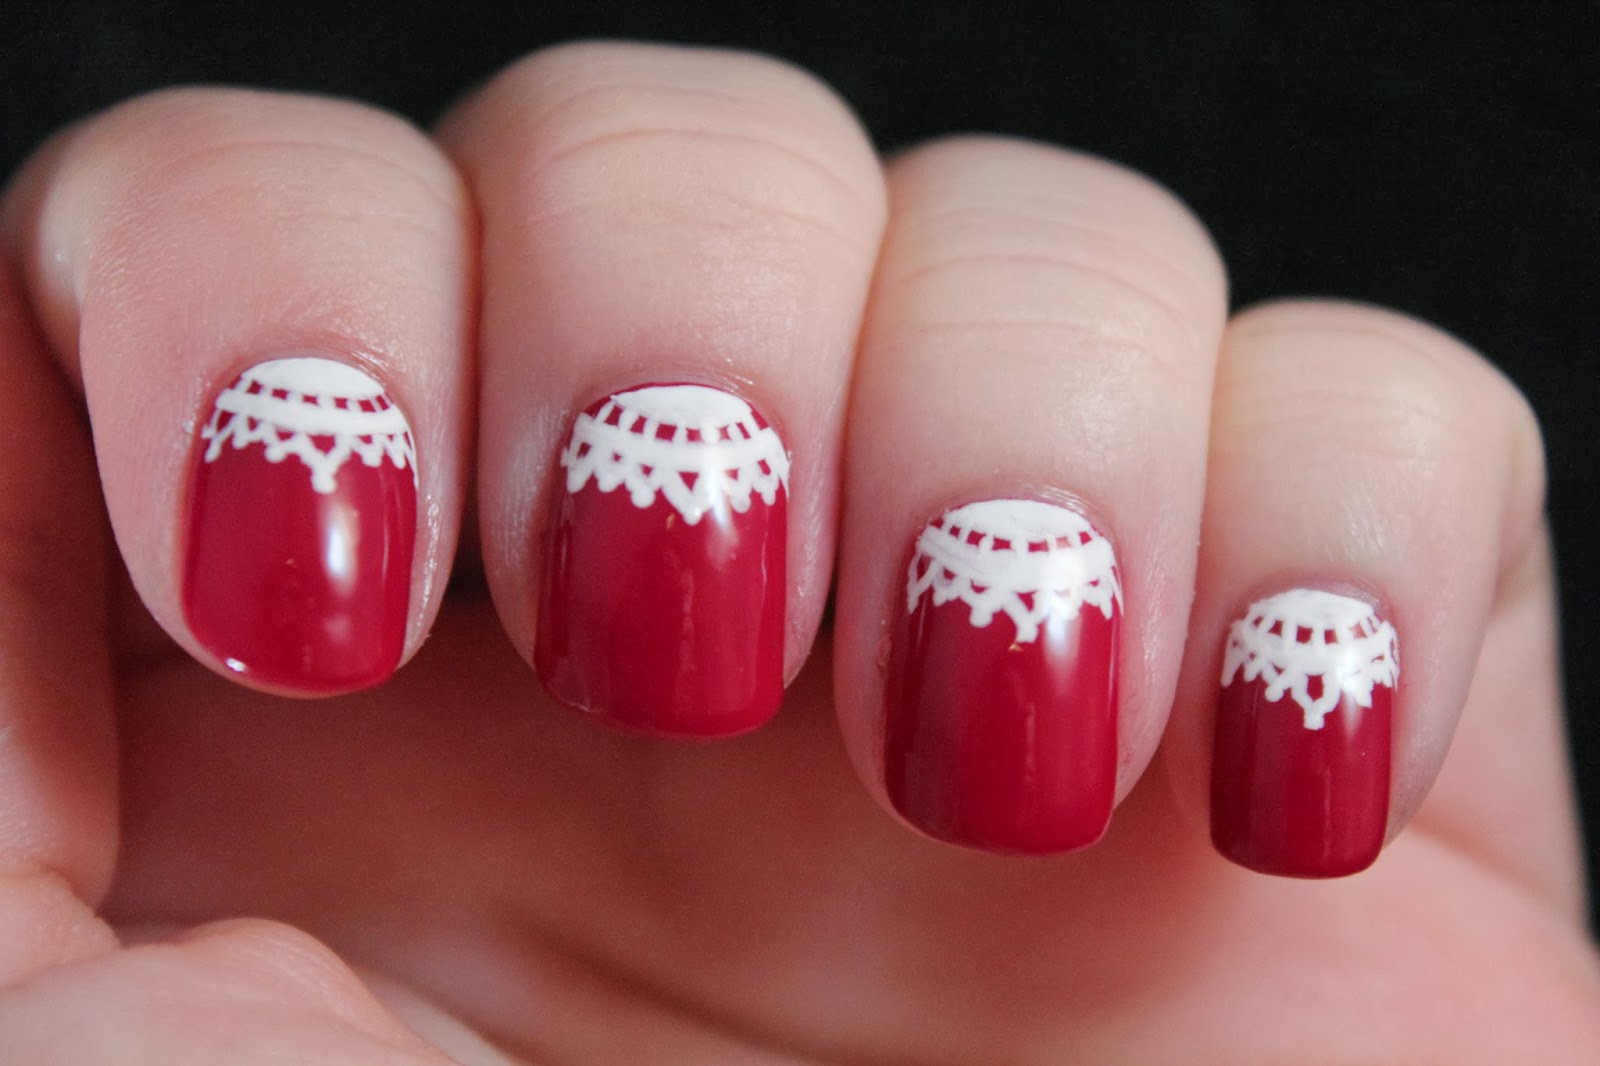


This mani is quite dainty and oh so cute on your nails. You'll feel pampered and precious once you get this look on your tips :) Hope you give this a try and share it with me on my facebook page https://www.facebook.com/GlimpsesOfTheMoon. Btw, the top coat I've been using a loving a lot lately was a happy surprise. In the Color Club box sets you can sometimes find at Ross or Marshalls, they include a clear top or base coat- and I have had NO smearing problems for the whole week I've been using it so far which is majorly awesome. I like the topper Out the Door for the way it has no shrinkage like Seche Vite does, but it drags my designs and smears them easier than Seche Vite. This one is like the best of both worlds. It's a little on the thick side, but if you're intentional with your brush, I've found it to be great!
Hopefully I'll see you back tomorrow for highlights of the challenge. Hope you've enjoyed coming on this journey with me- it's been a blast!--again!
Song of the Day: Snowden- The Beat Comes
*this link is provided for its audio and not video content*
Over and out.
No comments:
Post a Comment