I have Monday's Mani here and Tuesday's Tutorial for you today.
For the Monday Mani I did a skittle manicure. What makes it a "skittle" is that each nail has something different but they all fit within a theme.
I picked up this gorgeous blue from Sation called Blue Sky's the Limit and used it for the base color of all the nails except for the fourth finger which is Misa Beyond Infinity and also fabulous- almost a one-coater which led me to believe it might be a good stamper. As you can see it turned out kinda light on the middle finger, but not a total fail stamping polish :)
So Starting with the thumb- just two coats of the Sation and a small light green stone. The index finger is the base blue with the gray striped over top with a striping brush. On the middle finger I used a MASH stamp and accented it with some glitter polish in China Glaze Optical Illusion dotted into the pattern. Fourth finger is two coats of the Misa polish and the pinky is Optical Illusion in a gradient over the base blue.Here they are minus the thumb a little closer up. :)
Think you might rock the skittle look? This was such a fun way to go when you just can't decide what you wanna do with your nails that day- give it a try!
Tuesday Tutorial:
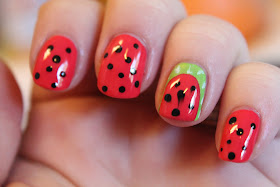
I have something fun and fruity for ya. This is a super electric watermelon mani. I was looking at some of the very delicious looking shades on my nail space and these colors screamed to be paired- so here's what they get- hope they aren't sorry they asked!
To start out you want to do two coats of your melon color on all fingers but one- which you'll do two coats of your rind color. The shades I used were Spoiled Lox-y Lady and I'm So Jaded. Yes the lime has a subtle shimmer and is so yum!
Next you want to take a black- this is Milani Black Swift- and using a dotting tool or a toothpick randomly dot the "seeds" on your nails. You can try dragging them into a less-than-round shape if you wanna, but I wasn't feeling steady enough for that =p Next, take your melon color again and paint over the green- in the same kind of stroke you would from the cuticle, but just start farther up the nail. Do two coats here.
Finally you 1) dot the accent nail 2) add a little detail with some white on top of the green and 3) top coat each nail. Learn from my mistake here peeps- I didn't wait quite long enough on the accent nail to add the top coat so blah- it dragged the seeds.
Here's another view: Bear said- "Mom, I can't tell you messed up. It just looks a little scary- so perfect for Halloween!" Oh well ;) I wouldn't survive as a perfectionist. I can only beat myself up over mistakes for so long lol and then you just gotta let it go =D
Have a great Halloween tomorrow all my lovelies!!
Over and Out


No comments:
Post a Comment